introduction
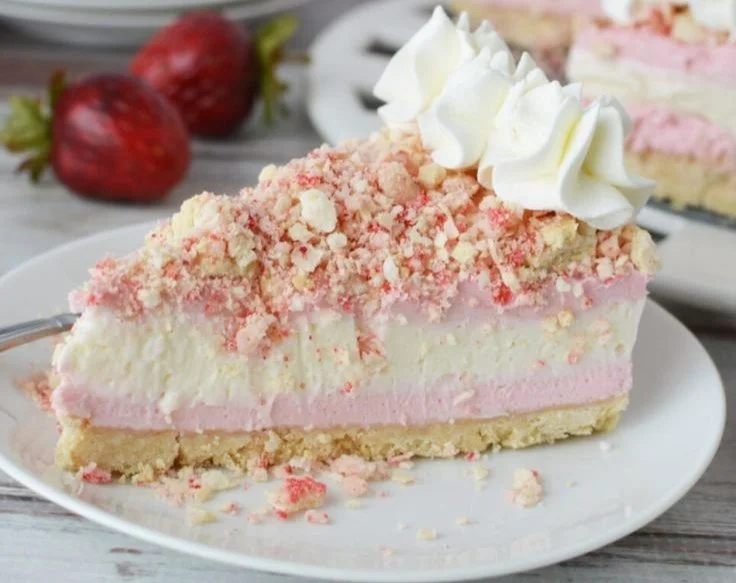
Strawberry Crunch Cheesecake is a delightful dessert that perfectly balances creamy and fruity flavors with a satisfying crunch. This layered cheesecake is not just a treat for the taste buds—it’s also a feast for the eyes, making it perfect for gatherings or special occasions.
Why You’ll Love This Strawberry Crunch Cheesecake:
- Delectable Flavor: The combination of strawberries and cream cheese creates a rich and flavorful dessert that’s sure to please.
- Texture Contrast: Enjoy the creamy cheesecake paired with a crunchy cookie crust and topping for a delightful bite every time.
- Make-Ahead Magic: With some chilling time, this cheesecake can be prepared in advance, allowing you more time to enjoy your event.
- Family-Friendly Fun: Kids and adults alike will love this visually stunning and delicious dessert, making it a family favorite.
- Perfect for Celebrations: The vibrant colors and creamy layers make this cheesecake an attractive addition to any celebration.
Ingredients Needed
Crust:
- 1 lb vanilla cream cookies (about 34 cookies), divided
- 6 tablespoons butter, melted
Filling:
- 1 small box (3.3 oz) strawberry gelatin
- 1 cup boiling water
- 2 bricks (8 oz each) cream cheese, softened
- 3/4 cup granulated sugar
- 2 cups heavy whipping cream
- 1/2 cup powdered sugar
Topping:
- 10 strawberry wafer cookies (about 4 oz), divided
- About half a small tub of whipped topping, thawed

Step-by-Step Instructions
Crust: Place 26 cookies into a food processor and process until fine crumbs. Add melted butter and process until crumbly. Press evenly into the bottom of a greased 10" springform pan. Freeze for 15 minutes.
Filling: Combine boiling water and gelatin, mixing until dissolved. In another bowl, beat cream cheese and sugar until smooth. Beat whipping cream and powdered sugar in a separate bowl until stiff peaks form. Fold half of the whipped cream into the cream cheese mixture and the other half into the gelatin mixture.
Layering: Pour half of the strawberry mixture over the crust and freeze for 15 minutes. Add the cream cheese mixture, then top with the remaining strawberry mixture.
Topping: Coarsely crush remaining vanilla cream cookies and strawberry wafers, mix them, and sprinkle on top of the cheesecake.
Chill: Refrigerate for at least 4 hours or until you’re ready to serve. Top with whipped topping if desired before serving.
Serving Suggestions Strawberry Crunch Cheesecake
This stunning cheesecake pairs beautifully with fresh strawberries or a drizzle of chocolate sauce. Serve with additional whipped topping on the side for an extra indulgence.
Tips for Success Strawberry Crunch Cheesecake
- Ensure that your cream cheese is softened at room temperature for the best mixing results.
- Don’t rush the chilling process; letting the cheesecake set for a full 4 hours ensures perfect slices.
- For an extra flavor kick, try adding crushed nuts to the topping.
- Use a rubber spatula to fold the whipped cream gently to maintain its light and airy texture.
- If you’re in a rush, consider using store-bought whipped topping for convenience.
Variation
For a different flavor profile, swap out the strawberry gelatin for raspberry or peach, and adjust the flavor of the wafer cookies accordingly!
FAQs
Can I make this cheesecake in advance?
Yes! Strawberry Crunch Cheesecake can be made a day in advance, allowing it to chill overnight to set beautifully.
What if I don’t have a springform pan?
You can use a regular pie dish, but it might be challenging to remove the cheesecake without a springform pan.
Can I use fresh strawberries instead of gelatin?
Absolutely! Fresh strawberries can be pureed and added, but you may need to adjust the sugar levels since fresh strawberries can vary in sweetness.
Strawberry Crunch Cheesecake
Ingredients
Crust
- 1 lb vanilla cream cookies (about 34 cookies), divided
- 6 tablespoons butter, melted
Filling
- 1 small box (3.3 oz) strawberry gelatin
- 1 cup boiling water
- 2 bricks (8 oz each) cream cheese, softened
- 3/4 cup granulated sugar
- 2 cups heavy whipping cream
- 1/2 cup powdered sugar
Topping
- 10 cookies (about 4 oz) strawberry wafer cookies, divided
- about half a small tub whipped topping, thawed
Instructions
Crust
- Place 26 cookies into a food processor and process until fine crumbs. Add melted butter and process until crumbly. Press evenly into the bottom of a greased 10" springform pan. Freeze for 15 minutes.
Filling
- Combine boiling water and gelatin, mixing until dissolved.
- In another bowl, beat cream cheese and sugar until smooth.
- Beat whipping cream and powdered sugar in a separate bowl until stiff peaks form.
- Fold half of the whipped cream into the cream cheese mixture and the other half into the gelatin mixture.
Layering
- Pour half of the strawberry mixture over the crust and freeze for 15 minutes.
- Add the cream cheese mixture, then top with the remaining strawberry mixture.
Topping
- Coarsely crush remaining vanilla cream cookies and strawberry wafers, mix them, and sprinkle on top of the cheesecake.
Chill
- Refrigerate for at least 4 hours or until you’re ready to serve. Top with whipped topping if desired before serving.